Sound complicated? Well it might, but it's not. Descendant selectors are something we should get used to using in our everyday web design/development process. The descendant selector allows us to target elements within our work in a hierarchical manner.
Think parent-child relationships
In this step, we will explore how to use style specific elements of the parent element and apply them to the child. All will be explained as we work our way through steps.
 Steps to Success
Creating A Simple Descendant Selector
- Add this html code to the content division in containers.html
<h1>Our styled h1 element</h1>
<p><em>Some emphasized text in a paragraph </em></p>
We'll begin by looking at the syntax we might use to create a simple selector, and we will then look at how we can isolate our styles with a descendant selector. We will begin with Illustration 1, changing the rule for an h1 element and an em element
- Add the followingto layout.css:
- Add the following to layout.css
h1{
font-family: Georgia, "Times New Roman", Times, serif;
font-size: 15px;
color: #000000;
background-color: transparent;
}
em{
color: #ff0000;
background-color: transparent;
}
Illustration 1: Creating a rule for our h1 and em elements
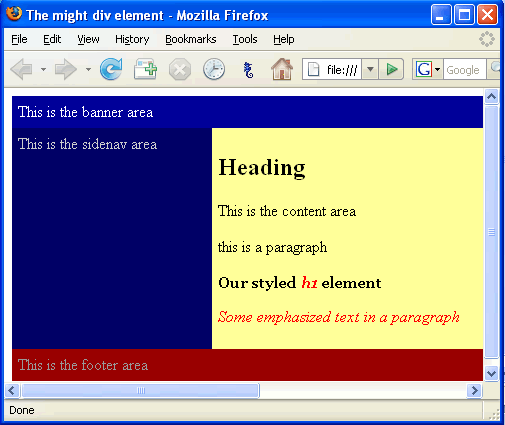
Image 1: The results of our CSS
The two samples above are reflecting the two rule we created in Illustration 1. Our aim here was to emphasize the h1 text within the h1 element, and this has worked, as we can see. The text is italicised and its colour has changed to red. Perfect... well nearly. The problem we now have is that all text within the em tags - anywhere on our site, should we be using a linked style sheet - will take on this appearance, which might be undesirable on a site-wide basis. We really need to isolate our em rule so it only affects any emphasised text when inside the h1 element.
This is a job for the descendant selector. Essentially the descendant selector allows us to define rule for our elements based on their relationship with a parent element. This relationship might be a parent-child relationship, a parent-grandchild relationship or any other relationship as we shall see as we progress through this tutorial. We begin by looking at a parent-child relationship. Our parent element will be our h1 element and since the em element will be the child in that relationship, we would write this rule as shown in Illustration 2.
- Add the following (in red) to mycss.css:
h1{
font-family: Georgia, "Times New Roman", Times, serif;
font-size: 15px;
color: #000000;
background-color: transparent;
}
h1 em{
color: #ff0000;
background-color: transparent;
}
Illustration 2: Defining a descendant relationship between two elements
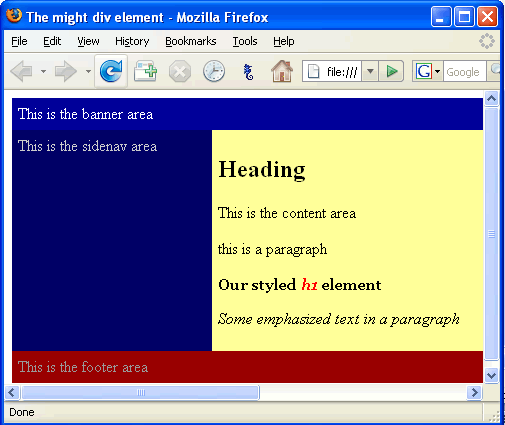
Image 2: That is looking better!
So what exactly happened here? The h1 em defines a relationship between two elements. It saying this, in plain English.
If you find an h1 element that contains an em element, emphasise the text within the em element. With our rule we have stated we want the em element to contain red text, but only if the em element lives inside an h1 element.
You will notice that the text that says "Some emphasised text" is no longer red. With our new rule , as we have just discussed, the only em elements that will take on the red colour are those that live within an h1 element. Let's take a look at the the html that produces this display.
<h1>Our styled <em>h1</em> element</h1>
Illustration 3: Our html code that produces the styling we can see in Image 2
Well, that is that, as they say. We have just created our descendant selector; we can move on from here, and we will soon. You should now have a good idea of how a descendant selector works, so the rest will be easy.